
What’s the crack jack?
Table of contents
1. 7-Segment Display
2. Cathode vs Anode
3. Components
4. Schematics
5. Code
6. PI4J
7. Links
1. 7-Segment Display
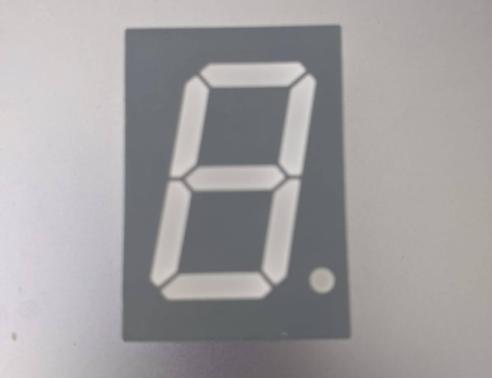
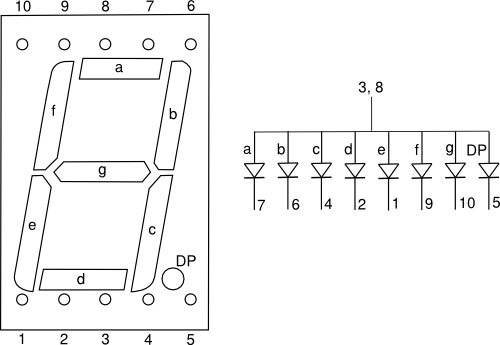
The 7-segment display, also written as “seven segment display”, consists of seven LEDs (hence its name) arranged in a rectangular fashion as shown. Each of the seven LEDs is called a segment because when illuminated the segment forms part of a numerical digit (both Decimal and Hex) to be displayed. An additional 8th LED is sometimes used within the same package thus allowing the indication of a decimal point (DP).
A 7-segment is a packaged set of 8 LEDs (7 number-segments & 1 decimal point).
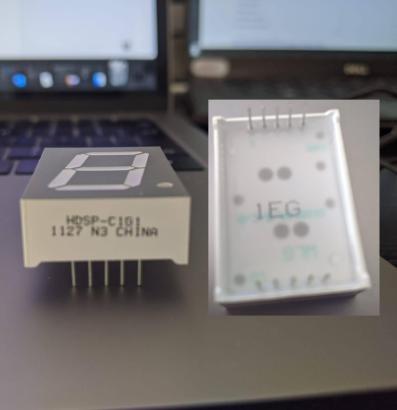
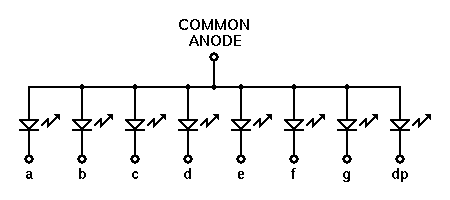
I have the “hdsp-c1g1” model and it is a Common-Anode.
2. Cathode vs Anode
Common anode means that the anode (positive) side of all of the LEDs is electrically connected at one pin, and each LED cathode has its own pin. So turning on any particular segment will involve running a current from this common anode (positive) pin to the particular cathode (negative) pin for the desired segment.
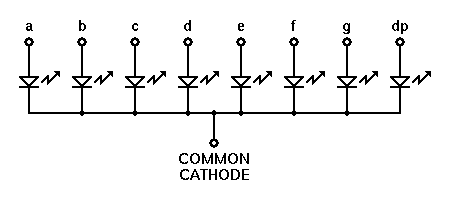
Common cathode means that the cathodes of all of the LEDs are common and connected to a single pin. The anode for each LED has its own pin. So driving one of these means running a current from the particular anode (positive) pin for the desired segment to the common cathode pin.
The way that you are diving the 7-segment involves using a separate pin to drive each segment, so you use 8 pins of the Arduino to drive the display.
3. Components
- 1x Arduino
- 1x Raspberry Pi
- 1x Common-Anode 7-segment display
- 8x Resistor 221 ohm
- 10x Jumper wires (generic)
4. Schematics
Common-Anode 7-segment display
My 7-segment display has its common pins (COM) connected to the +5V pin.
If a pin turns off, the corresponding segment will turn on. It’s because when the pin is on, the voltage difference between the pin and the +5V is 0. It is the same if the +5V was replaced by 0V. We can’t connect the COM to the GND because the LEDs are like diodes so they wouldn’t light up at all.

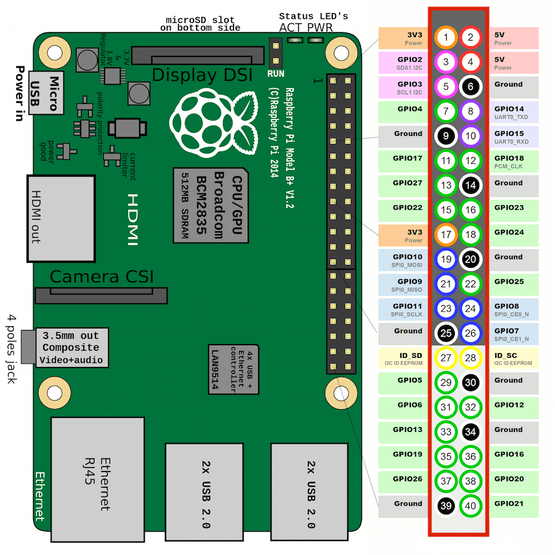
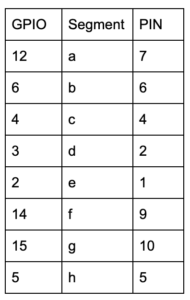
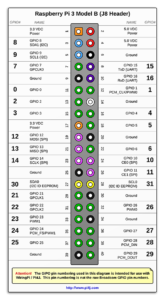
For Raspberry PI you need to check the GPIO numbers. Note that the pin number is not the same thing as the GPIO number.
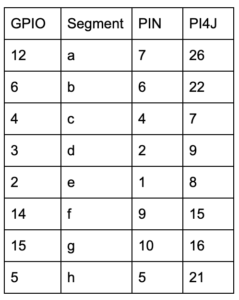
For my example here I create a table to map:
5. Code
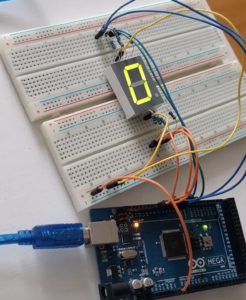
Arduino
1 2 3 4 5 6 7 8 9 10 11 12 13 14 15 16 17 18 19 20 21 22 23 24 25 26 27 28 29 30 31 32 33 34 35 36 37 38 39 40 41 42 43 44 45 46 47 48 49 50 51 52 53 54 55 56 57 58 59 60 61 62 63 64 65 66 67 68 69 70 71 72 73 74 75 76 77 78 79 80 81 82 83 84 85 86 87 88 89 90 91 92 93 94 95 96 97 98 99 100 101 102 103 104 105 106 107 108 109 110 111 112 113 114 115 116 117 118 119 120 121 122 123 124 125 126 127 128 129 130 131 132 133 134 135 136 137 138 139 140 141 142 143 144 145 146 147 148 149 150 151 152 153 154 155 156 157 158 159 160 161 162 163 164 165 166 167 168 169 170 171 172 | void setup() { init(); /*your setup code here*/ } void loop() { /* * your loop code here * * use display(num, dp) to display num (0123456789ABCDEF) * and the dot (if dp). * * you can turn off all the leds by writing display(). */ } void init() { pinMode(2, OUTPUT); pinMode(3, OUTPUT); pinMode(4, OUTPUT); pinMode(5, OUTPUT); pinMode(6, OUTPUT); pinMode(7, OUTPUT); pinMode(8, OUTPUT); pinMode(9, OUTPUT); } void display(int n=-1, boolean dp) { digitalWrite(9, !dp); if(num == 0) { digitalWrite(2, 0); digitalWrite(3, 0); digitalWrite(4, 0); digitalWrite(5, 0); digitalWrite(6, 0); digitalWrite(7, 0); digitalWrite(8, 1); } else if(num == 1) { digitalWrite(2, 1); digitalWrite(3, 0); digitalWrite(4, 0); digitalWrite(5, 1); digitalWrite(6, 1); digitalWrite(7, 1); digitalWrite(8, 1); } else if(num == 2) { digitalWrite(2, 0); digitalWrite(3, 0); digitalWrite(4, 1); digitalWrite(5, 0); digitalWrite(6, 0); digitalWrite(7, 1); digitalWrite(8, 0); } else if(num == 3) { digitalWrite(2, 0); digitalWrite(3, 0); digitalWrite(4, 0); digitalWrite(5, 0); digitalWrite(6, 1); digitalWrite(7, 1); digitalWrite(8, 0); } else if(num == 4) { digitalWrite(2, 1); digitalWrite(3, 0); digitalWrite(4, 0); digitalWrite(5, 1); digitalWrite(6, 1); digitalWrite(7, 0); digitalWrite(8, 0); } else if(num == 5) { digitalWrite(2, 0); digitalWrite(3, 1); digitalWrite(4, 0); digitalWrite(5, 0); digitalWrite(6, 1); digitalWrite(7, 0); digitalWrite(8, 0); } else if(num == 6) { digitalWrite(2, 0); digitalWrite(3, 1); digitalWrite(4, 0); digitalWrite(5, 0); digitalWrite(6, 0); digitalWrite(7, 0); digitalWrite(8, 0); } else if(num == 7) { digitalWrite(2, 0); digitalWrite(3, 0); digitalWrite(4, 0); digitalWrite(5, 1); digitalWrite(6, 1); digitalWrite(7, 1); digitalWrite(8, 1); } else if(num == 8) { digitalWrite(2, 0); digitalWrite(3, 0); digitalWrite(4, 0); digitalWrite(5, 0); digitalWrite(6, 0); digitalWrite(7, 0); digitalWrite(8, 0); } else if(num == 9) { digitalWrite(2, 0); digitalWrite(3, 0); digitalWrite(4, 0); digitalWrite(5, 0); digitalWrite(6, 1); digitalWrite(7, 0); digitalWrite(8, 0); } else if(num == 10) { digitalWrite(2, 0); digitalWrite(3, 0); digitalWrite(4, 0); digitalWrite(5, 1); digitalWrite(6, 0); digitalWrite(7, 0); digitalWrite(8, 0); } else if(num == 11) { digitalWrite(2, 1); digitalWrite(3, 1); digitalWrite(4, 0); digitalWrite(5, 0); digitalWrite(6, 0); digitalWrite(7, 0); digitalWrite(8, 0); } else if(num == 12) { digitalWrite(2, 0); digitalWrite(3, 1); digitalWrite(4, 1); digitalWrite(5, 0); digitalWrite(6, 0); digitalWrite(7, 0); digitalWrite(8, 1); } else if(num == 13) { digitalWrite(2, 1); digitalWrite(3, 0); digitalWrite(4, 0); digitalWrite(5, 0); digitalWrite(6, 0); digitalWrite(7, 1); digitalWrite(8, 0); } else if(num == 14) { digitalWrite(2, 0); digitalWrite(3, 1); digitalWrite(4, 1); digitalWrite(5, 0); digitalWrite(6, 0); digitalWrite(7, 0); digitalWrite(8, 0); } else if(num == 15) { digitalWrite(2, 0); digitalWrite(3, 1); digitalWrite(4, 1); digitalWrite(5, 1); digitalWrite(6, 0); digitalWrite(7, 0); digitalWrite(8, 0); } else { digitalWrite(2, 1); digitalWrite(3, 1); digitalWrite(4, 1); digitalWrite(5, 1); digitalWrite(6, 1); digitalWrite(7, 1); digitalWrite(8, 1); } } |
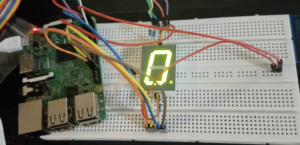
Raspberry PI – Python
1 2 3 4 5 6 7 8 9 10 11 12 13 14 15 16 17 18 19 20 21 22 23 24 25 26 27 28 29 30 31 32 33 34 35 36 37 38 39 40 41 42 43 44 45 46 47 48 49 50 51 52 53 54 55 56 57 58 59 60 61 62 63 64 65 66 67 68 69 70 71 72 73 74 75 76 77 78 79 80 81 82 83 84 85 86 87 88 89 90 91 92 93 94 95 96 97 98 99 100 101 102 103 104 105 106 107 108 109 110 111 112 113 114 115 116 117 118 119 120 121 122 123 | from gpiozero import LED from time import sleep pin01 = LED(2) pin02 = LED(3) pin04 = LED(4) pin05 = LED(5) pin06 = LED(6) pin07 = LED(12) pin09 = LED(14) pin10 = LED(15) def clear(): pin01.on() pin02.on() pin04.on() pin05.on() pin06.on() pin07.on() pin09.on() pin10.on() def display(number): if number == 0: pin01.off() pin02.off() pin04.off() pin05.on() pin06.off() pin07.off() pin09.off() pin10.on() if number == 1: pin01.on() pin02.on() pin04.off() pin05.on() pin06.off() pin07.on() pin09.on() pin10.on() if number == 2: pin01.off() pin02.off() pin04.on() pin05.on() pin06.off() pin07.off() pin09.on() pin10.off() if number == 3: pin01.on() pin02.off() pin04.off() pin05.on() pin06.off() pin07.off() pin09.on() pin10.off() if number == 4: pin01.on() pin02.on() pin04.off() pin05.on() pin06.off() pin07.on() pin09.off() pin10.off() if number == 5: pin01.on() pin02.off() pin04.off() pin05.on() pin06.on() pin07.off() pin09.off() pin10.off() if number == 6: pin01.off() pin02.off() pin04.off() pin05.off() pin06.on() pin07.off() pin09.off() pin10.off() if number == 7: pin01.on() pin02.on() pin04.off() pin05.on() pin06.off() pin07.off() pin09.on() pin10.on() if number == 8: pin01.off() pin02.off() pin04.off() pin05.on() pin06.off() pin07.off() pin09.off() pin10.off() if number == 9: pin01.on() pin02.on() pin04.off() pin05.off() pin06.off() pin07.off() pin09.off() pin10.off() clear() sleep(1) while True: for x in range(10): display(x) sleep(1) |
6. PI4J
PI4J provides a friendly object-oriented I/O API and implementation libraries for Java programmers to access the full I/O capabilities of the Raspberry Pi platform. This project abstracts the low-level native integration and interrupts monitoring to enable Java programmers to focus on implementing their application business logic.
Note: Pi4J (by default) uses an abstract pin numbering scheme to help insulate software from hardware changes.Pi4J implements the same pin number scheme as the Wiring Pi
This is the Number for the PI 3 B model.
Because the PI4J use a different GPIO number I add a new column in my table;
Raspberry PI – Java – Pi4j
1 2 3 4 5 6 7 8 9 10 11 12 13 14 15 16 17 18 19 20 21 22 23 24 25 26 27 28 29 30 31 32 33 34 35 36 37 38 39 40 41 42 43 44 45 46 47 48 49 50 51 52 53 54 55 56 57 58 59 60 61 62 63 64 65 66 67 68 69 70 71 72 73 74 75 76 77 78 79 80 81 82 83 84 85 86 87 88 89 90 91 92 93 94 95 96 97 98 99 100 101 102 103 104 105 106 107 108 109 110 111 112 113 114 115 116 117 118 119 120 121 122 123 124 125 126 127 128 129 130 131 132 133 134 135 136 137 138 139 140 141 142 143 144 145 146 147 148 149 150 151 152 153 154 155 156 157 158 159 160 161 162 | package led.example; import com.pi4j.io.gpio.GpioController; import com.pi4j.io.gpio.GpioFactory; import com.pi4j.io.gpio.GpioPinDigitalOutput; import com.pi4j.io.gpio.PinState; import com.pi4j.io.gpio.RaspiPin; public class SevenSegmentsDisplay { static GpioPinDigitalOutput pin01 = null; static GpioPinDigitalOutput pin02 = null; static GpioPinDigitalOutput pin04 = null; static GpioPinDigitalOutput pin05 = null; static GpioPinDigitalOutput pin06 = null; static GpioPinDigitalOutput pin07 = null; static GpioPinDigitalOutput pin09 = null; static GpioPinDigitalOutput pin10 = null; public static void display(int number) { if(number == 0) { pin01.low(); pin02.low(); pin04.low(); pin05.high(); pin06.low(); pin07.low(); pin09.low(); pin10.high(); } if(number == 1) { pin01.high(); pin02.high(); pin04.low(); pin05.high(); pin06.low(); pin07.high(); pin09.high(); pin10.high(); } if(number == 2) { pin01.low(); pin02.low(); pin04.high(); pin05.high(); pin06.low(); pin07.low(); pin09.high(); pin10.low(); } if(number == 3) { pin01.high(); pin02.low(); pin04.low(); pin05.high(); pin06.low(); pin07.low(); pin09.high(); pin10.low(); } if(number == 4) { pin01.high(); pin02.high(); pin04.low(); pin05.high(); pin06.low(); pin07.high(); pin09.low(); pin10.low(); } if(number == 5) { pin01.high(); pin02.low(); pin04.low(); pin05.high(); pin06.high(); pin07.low(); pin09.low(); pin10.low(); } if(number == 6) { pin01.low(); pin02.low(); pin04.low(); pin05.low(); pin06.high(); pin07.low(); pin09.low(); pin10.low(); } if(number == 7) { pin01.high(); pin02.high(); pin04.low(); pin05.high(); pin06.low(); pin07.low(); pin09.high(); pin10.high(); } if(number == 8) { pin01.low(); pin02.low(); pin04.low(); pin05.high(); pin06.low(); pin07.low(); pin09.low(); pin10.low(); } if(number == 9) { pin01.high(); pin02.low(); pin04.low(); pin05.low(); pin06.low(); pin07.low(); pin09.low(); pin10.low(); } } public static void main(String[] args) { final GpioController gpio = GpioFactory.getInstance(); pin01 = gpio.provisionDigitalOutputPin(RaspiPin.GPIO_08); pin02 = gpio.provisionDigitalOutputPin(RaspiPin.GPIO_09); pin04 = gpio.provisionDigitalOutputPin(RaspiPin.GPIO_07); pin05 = gpio.provisionDigitalOutputPin(RaspiPin.GPIO_21); pin06 = gpio.provisionDigitalOutputPin(RaspiPin.GPIO_22); pin07 = gpio.provisionDigitalOutputPin(RaspiPin.GPIO_26); pin09 = gpio.provisionDigitalOutputPin(RaspiPin.GPIO_15); pin10 = gpio.provisionDigitalOutputPin(RaspiPin.GPIO_16); pin01.setShutdownOptions(true, PinState.HIGH); pin02.setShutdownOptions(true, PinState.HIGH); pin04.setShutdownOptions(true, PinState.HIGH); pin05.setShutdownOptions(true, PinState.HIGH); pin06.setShutdownOptions(true, PinState.HIGH); pin07.setShutdownOptions(true, PinState.HIGH); pin09.setShutdownOptions(true, PinState.HIGH); pin10.setShutdownOptions(true, PinState.HIGH); try { while(true) { for (int i = 0; i < 10; i++) { display(i); System.out.println("Number " + i); Thread.sleep(2000); } } } catch (InterruptedException e) { e.printStackTrace(); } finally { gpio.shutdown(); } } } |
Results
Just playing …
Raspberry PI I did the code in Python and Java
Arduino C #raspberrypi #arduino pic.twitter.com/rmDRiAJsO6— Igor Souza (@Igfasouza) May 2, 2020
7. Links
https://en.wikipedia.org/wiki/Cathode
https://en.wikipedia.org/wiki/Anode