Hey you!
This post is to show how I created a Quarkus Qute demo with a Raspberry PI. This is another blog about Java on Raspberry PI.
Quarkus is a full-stack, Kubernetes-native Java framework made for Java virtual machines (JVMs) and native compilation, optimizing Java specifically for containers and enabling it to become an effective platform for serverless, cloud, and Kubernetes environments.
Qute is a templating engine designed specifically to meet the Quarkus needs. The usage of reflection is minimized to reduce the size of native images. The API combines both the imperative and the non-blocking reactive style of coding. The engine is based on RESTEasy/JAX-RS. As such, Qute web applications are implemented by defining resource types with methods answering to specific HTTP verbs and accept headers. The only difference being, that HTML pages are returned instead of JSON as in your typical REST-ful data API. The individual pages are created by processing template files.
If you’ve worked with other templating engines before, like me, this will look very familiar to you.
Note: Qute is an experimental feature.
Idea
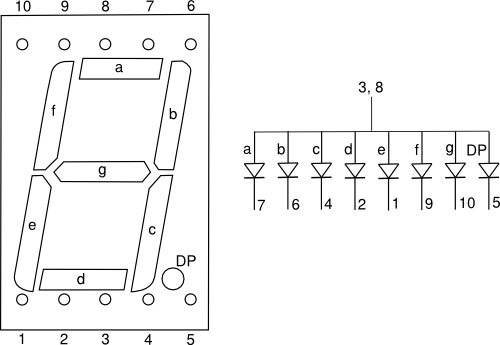
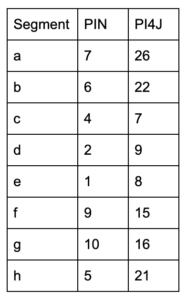
A simple Quarkus Qute example that shows a 7 segments display and control in real-time a real one with a Raspberry Pi 3 B.
When I was googling about a 7 segment display this site appeared in my result and I came up with the idea.
I suggest you check out my 7 segment display blog before looking at the code.


Code
1 2 3 4 5 6 7 8 9 10 11 12 13 14 15 16 17 18 19 20 21 22 23 24 25 26 27 28 29 30 31 32 33 34 35 36 37 38 39 40 41 42 43 44 45 46 47 48 49 50 51 52 53 54 55 56 57 58 59 60 61 62 63 64 65 66 67 68 69 70 71 72 73 74 75 76 77 78 79 80 81 82 83 84 85 86 87 88 89 90 91 92 93 94 95 96 97 98 99 100 101 102 103 104 105 106 107 108 109 110 111 112 113 114 115 116 117 118 119 120 121 122 123 124 125 126 127 | package com.igor; import io.quarkus.qute.Template; import io.quarkus.qute.TemplateInstance; import javax.inject.Inject; import javax.transaction.Transactional; import javax.ws.rs.Consumes; import javax.ws.rs.GET; import javax.ws.rs.POST; import javax.ws.rs.Path; import javax.ws.rs.Produces; import javax.ws.rs.core.MediaType; import org.jboss.resteasy.annotations.providers.multipart.MultipartForm; import com.pi4j.io.gpio.GpioController; import com.pi4j.io.gpio.GpioFactory; import com.pi4j.io.gpio.GpioPinDigitalOutput; import com.pi4j.io.gpio.PinState; import com.pi4j.io.gpio.RaspiPin; @Path("hello") public class HelloResource { @Inject Template hello; final GpioController gpio = GpioFactory.getInstance(); GpioPinDigitalOutput pin01 = gpio.provisionDigitalOutputPin(RaspiPin.GPIO_26, "1", PinState.HIGH); GpioPinDigitalOutput pin02 = gpio.provisionDigitalOutputPin(RaspiPin.GPIO_22, "2", PinState.HIGH); GpioPinDigitalOutput pin04 = gpio.provisionDigitalOutputPin(RaspiPin.GPIO_07, "3", PinState.HIGH); GpioPinDigitalOutput pin05 = gpio.provisionDigitalOutputPin(RaspiPin.GPIO_09, "4", PinState.HIGH); GpioPinDigitalOutput pin06 = gpio.provisionDigitalOutputPin(RaspiPin.GPIO_08, "5", PinState.HIGH); GpioPinDigitalOutput pin07 = gpio.provisionDigitalOutputPin(RaspiPin.GPIO_15, "6", PinState.HIGH); GpioPinDigitalOutput pin09 = gpio.provisionDigitalOutputPin(RaspiPin.GPIO_16, "7", PinState.HIGH); GpioPinDigitalOutput pin10 = gpio.provisionDigitalOutputPin(RaspiPin.GPIO_21, "8", PinState.HIGH); @GET @Produces(MediaType.TEXT_HTML) public TemplateInstance get() { return hello.data("field1", "Test").data("field2", "Igor"); } @POST @Consumes(MediaType.MULTIPART_FORM_DATA) @Transactional @Path("/segment") public TemplateInstance segmentDisplay(@MultipartForm MessageForm messageForm) { if(messageForm.segment1 == null && messageForm.segment2 == null && messageForm.segment3 == null && messageForm.segment4 == null && messageForm.segment5 == null && messageForm.segment6 == null && messageForm.segment7 == null && messageForm.segment8 == null) { pin01.setShutdownOptions(true, PinState.HIGH); pin02.setShutdownOptions(true, PinState.HIGH); pin04.setShutdownOptions(true, PinState.HIGH); pin05.setShutdownOptions(true, PinState.HIGH); pin06.setShutdownOptions(true, PinState.HIGH); pin07.setShutdownOptions(true, PinState.HIGH); pin09.setShutdownOptions(true, PinState.HIGH); pin10.setShutdownOptions(true, PinState.HIGH); pin01.high(); pin02.high(); pin04.high(); pin05.high(); pin06.high(); pin07.high(); pin09.high(); pin10.high(); } display(messageForm); return hello.data("field1", "Test").data("field2", "Igor") .data("segment1", messageForm.segment1) .data("segment2", messageForm.segment2) .data("segment3", messageForm.segment3) .data("segment4", messageForm.segment4) .data("segment5", messageForm.segment5) .data("segment6", messageForm.segment6) .data("segment7", messageForm.segment7) .data("segment8", messageForm.segment8); } public void display(MessageForm messageForm) { if(messageForm.segment1 != null && messageForm.segment1.equals("on")) { pin01.low(); }else { pin01.high(); } if(messageForm.segment2 != null && messageForm.segment2.equals("on")) { pin02.low(); }else { pin02.high(); } if(messageForm.segment3 != null && messageForm.segment3.equals("on")) { pin04.low(); }else { pin04.high(); } if(messageForm.segment4 != null && messageForm.segment4.equals("on")) { pin05.low(); }else { pin05.high(); } if(messageForm.segment5 != null && messageForm.segment5.equals("on")) { pin06.low(); }else { pin06.high(); } if(messageForm.segment6 != null && messageForm.segment6.equals("on")) { pin07.low(); }else { pin07.high(); } if(messageForm.segment7 != null && messageForm.segment7.equals("on")) { pin09.low(); }else { pin09.high(); } if(messageForm.segment8 != null && messageForm.segment8.equals("on")) { pin10.low(); }else { pin10.high(); } } } |
Disclaimer – I got the CSS from here
You can get the full code on my GitHub.
Links
https://quarkus.io/guides/qute
https://quarkus.io/guides/qute-reference
