
How’s the man?
This blog post is part of my series of posts regarding Kafka Connect.
If you’re not familiar with Kafka, I suggest you have a look at some of my previous post;
What is Kafka?
Kafka Connect Overview
Kafka Connector Architecture
Kafka Connect
This post is a collection of links, videos, tutorials, blogs and books that I found mixed with my opinion.
TL;DR
This post is about code, I’ll show all steps to develop your own Source Kafka Connector, and in the end, I’ll show an easy way to deploy your code.
Openweathermap source kafka Connector.
Table of contents
1. Get Started
2. Use Case
3. Shema
4. AbstractConfig
5. Connector
6. Task
7. Code
8. SMTs
9. Converter
10. Transformation
11. Deploy
12. Links
1. Get Started
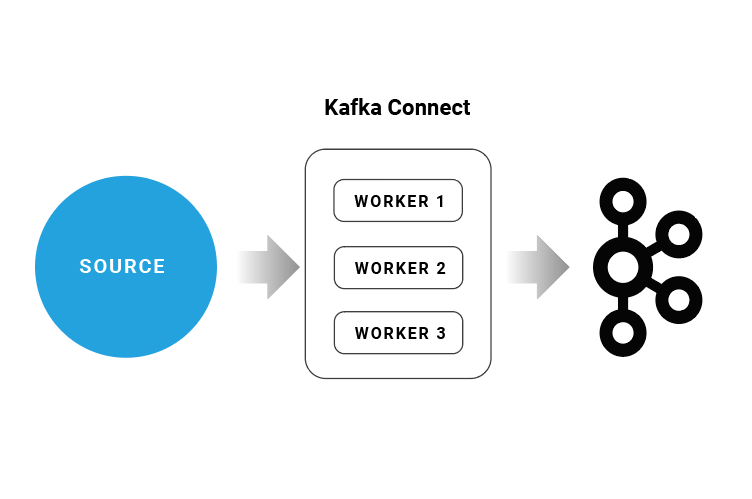
Kafka Connect aims to reduce the burden of connecting Kafka with external systems such as databases, key-value stores, search indexes, and even file systems. Connectors are the high-level abstractions that manage the streaming of data from and to Kafka. Each connector speaks the language of the external system it connects to, hiding this complexity from the application developer who can focus on more valuable business logic.
The best place to start when implementing your Source Connector is the Confluent Connector Development Guide.
There’s a code sample here;
This maven quickstart is used to generate a skeleton plugin for Kafka Connect. Here.
1 2 3 4 5 6 7 8 9 10 11 12 13 14 | mvn archetype:generate \ -DarchetypeGroupId=com.github.jcustenborder.kafka.connect \ -DarchetypeArtifactId=kafka-connect-quickstart \ -DarchetypeVersion=2.4.0 mvn archetype:generate \ -DarchetypeGroupId=com.github.jcustenborder.kafka.connect \ -DarchetypeArtifactId=kafka-connect-quickstart \ -DarchetypeVersion=2.4.0 \ -Dpackage=com.github.jcustenborder.kafka.connect.test \ -DgroupId=com.github.jcustenborder.kafka.connect \ -DartifactId=testconnect \ -DpackageName=com.github.jcustenborder.kafka.connect.test \ -Dversion=1.0-SNAPSHOT |
The nice thing about the Archetype is that it will create the boilerplate code for your connector, some basic properties, and some empty tests.
The dependencies that I used are;
1 2 3 4 5 6 7 8 9 10 11 12 13 14 15 16 17 18 19 20 | <dependency> <groupId>org.apache.kafka</groupId> <artifactId>connect-api</artifactId> <version>2.3.1</version> </dependency> <dependency> <groupId>org.apache.kafka</groupId> <artifactId>connect-transforms</artifactId> <version>2.3.1</version> </dependency> <dependency> <groupId>commons-codec</groupId> <artifactId>commons-codec</artifactId> <version>1.13</version> </dependency> <dependency> <groupId>com.konghq</groupId> <artifactId>unirest-java</artifactId> <version>3.1.02</version> </dependency> |
And we also need the maven plugin to generate a jar with all dependencies.
1 2 3 4 5 6 7 8 9 10 11 12 13 14 15 16 17 18 19 | <plugin> <artifactId>maven-assembly-plugin</artifactId> <version>3.2.0</version> <configuration> <descriptorRefs> <descriptorRef>jar-with-dependencies</descriptorRef> </descriptorRefs> </configuration> <executions> <execution> <id>make-assembly</id> <phase>package</phase> <goals> <goal>single</goal> </goals> </execution> </executions> </plugin> |
2. Use Case
OpenWeatherMap real-time weather data website. This API is already used in a lot of examples around Development. I already used some time for IoT and Data analyse demos.
They have a free API tier, which is limited to 1 request per second, which is quite enough for tracking changes in weather. Their different API schemas return plenty of numeric and textual data, all interesting for analysis. This is a perfect example for us. I tried to choose an API that contains a more complex Json, as a result, to show more in a didactic way the Shema part.
Check the API.
A partition is a division of source records that usually depends on the source medium.
In our case, there is only one API URL and we are only ever requesting current data, so a very good partition would be query weather data for different cities and each partition would be processed by a separate task.
3. Schema
The Schema interface is one of the most important components of Kafka Connect. This allows you to define what the data looks like without having to worry about the way the data is stored.
Docs here.
The best way to start is to have a look at the API result, and you can see a sample at
1 2 3 4 5 6 7 8 9 10 11 12 13 14 15 16 17 18 19 20 21 22 23 24 25 26 27 28 29 30 31 32 33 34 35 36 37 38 39 40 41 42 | { "coord": { "lon": -0.13, "lat": 51.51 }, "weather": [ { "id": 300, "main": "Drizzle", "description": "light intensity drizzle", "icon": "09d" } ], "base": "stations", "main": { "temp": 280.32, "pressure": 1012, "humidity": 81, "temp_min": 279.15, "temp_max": 281.15 }, "visibility": 10000, "wind": { "speed": 4.1, "deg": 80 }, "clouds": { "all": 90 }, "dt": 1485789600, "sys": { "type": 1, "id": 5091, "message": 0.0103, "country": "GB", "sunrise": 1485762037, "sunset": 1485794875 }, "id": 2643743, "name": "London", "cod": 200 } |
Here if you have a look in the json you are going to see that the json has some structures inside, for example, you can see weather that contains, id, main, descriptions and so on.
We can map this in an easy way to a schema;
1 2 3 4 5 6 7 8 | public static Schema WEATHER_SCHEMA = SchemaBuilder.struct() .name("Weather") .version(1) .field(ID, Schema.INT64_SCHEMA) .field(MAIN, Schema.STRING_SCHEMA) .field(DESCRIPTION, Schema.STRING_SCHEMA) .field(ICON, Schema.STRING_SCHEMA) .build(); |
But sometimes the json can contain a more complex structure and for this, we can create a schema that uses another schema as a type.
Let’s see wind
1 2 3 4 5 6 7 | public static Schema WIND_SCHEMA = SchemaBuilder.struct() .name("Wind") .version(1) .field(SPEED, Schema.OPTIONAL_FLOAT32_SCHEMA) .field(DEG, Schema.OPTIONAL_INT32_SCHEMA) .optional() .build(); |
So now I can create a schema using the others that I created before.
1 2 3 4 5 6 7 8 | public static Schema VALUE_SCHEMA = SchemaBuilder.struct() .name("Value Schema") .version(1) .field(NAME, Schema.STRING_SCHEMA) .field(WEATHER, WEATHER_ARRAY_SCHEMA) .field(MAIN, MAIN_SCHEMA) .field(WIND, WIND_SCHEMA) .build(); |
4. AbstractConfig
AbstractConfig is an abstract class that defines an interface that our WeatherAPIConfig
needs to adhere to, and here is where we get the configuration for our connector.
We need to pass the openWeatherApiKey, a list of cities, that we want to get the weather data and the kafka topic. I add pollFrequency as a hardcoded value because the API has a limitation of the number of requests in the free tier.
1 2 3 4 5 6 7 | public WeatherAPIConfig(Map<String, ?> originals) { super(config(), originals); this.openWeatherApiKey = this.getString(OPEN_WEATHER_API_KEY); this.cities = this.getString(CITIES); this.pollFrequency = this.getLong(POLL_FREQUENCY); this.kafkaTopic = this.getString(KAFKA_TOPIC); } |
5. Connector
SourceConnector is an abstract class that defines an interface that our WeatherAPIConnector
needs to adhere to. There are six methods.
1 2 3 4 5 6 7 8 9 10 11 12 13 14 15 16 17 18 19 20 21 22 23 24 25 26 27 28 29 30 31 32 33 | @Override public String version() { // you can add your own version strategy return null; } @Override public void start(Map<String, String> props) { // here is were we implement the configuration class } @Override public Class<? extends Task> taskClass() { // just need pass the name of the class return null; } @Override public List<Map<String, String>> taskConfigs(int maxTasks) { // here is a function partition strategy to split the list o cities to a different task return null; } @Override public void stop() { // since we don't start anything on Star method we don't need do anything here } @Override public ConfigDef config() { // here we already defined in the weatherAPI class return null; } |
6. Task
In a similar manner to the Source Connector class, we implement the Source Task abstract class. Here we have only 4 methods.
1 2 3 4 5 6 7 8 9 10 11 12 13 14 15 16 17 18 19 20 21 | @Override public String version() { // you can add your own version strategy return null; } @Override public void start(Map<String, String> props) { // initialize the configuration and the weather API client } @Override public List<SourceRecord> poll() throws InterruptedException { // this method is going to be called continuous and because of the API limitation, we need to add a sleep to decrease the poll frequency. return null; } @Override public void stop() { // TODO Auto-generated method stub } |
7. Code
I create one package model where I add my DTO to the fields that I used in my schema and package shema.
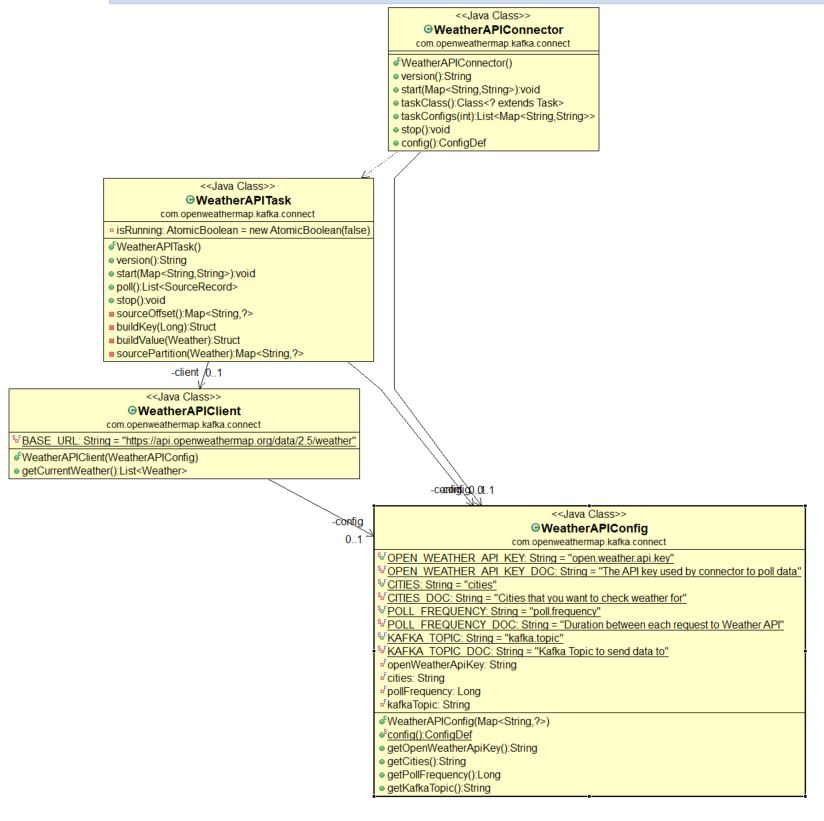
WeatherAPIClient this class just calls the API and passes the list of cities.
I use the WeatherAPIConfig config to get all configurations;
1 2 3 4 5 6 7 8 | public List<Weather> getCurrentWeather() { return Arrays.stream(config.getCities().split(",")) .map(city -> Unirest.get(BASE_URL) .queryString("q", city) .queryString("APPID", config.getOpenWeatherApiKey()) .asObject(Weather.class)) .map(HttpResponse::getBody) .collect(Collectors.toList()); |
8. SMTs
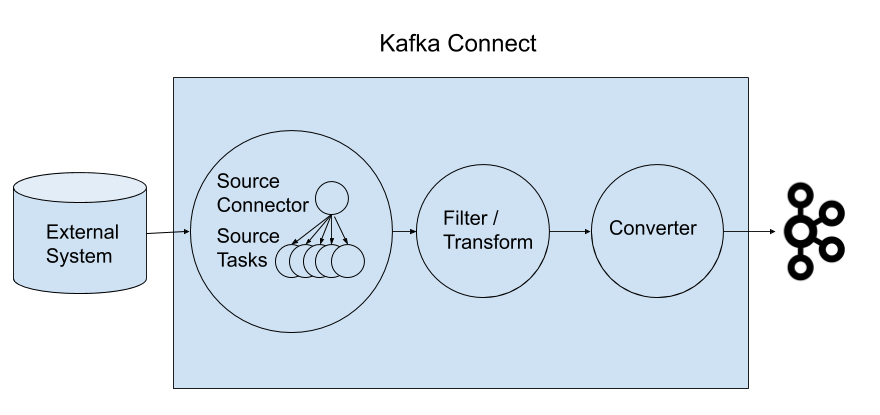
From an architectural point of view, SMT resides exactly between the connectors and the converters and they apply their data transformation just before storing the data into Kafka and right before extracting the data from it.
The Kafka Connect frameworks come with many built-in SMT to address the most common transformations use cases like for example:
- mask sensitive message fields,
- add identifiers,
- tag events,
- cast data types to comply to the destination,
- convert data (e.g. timestamp conversion like time-based data conversion standardization),
- slim down messages
- or re-routing them via re-partitioning.
Full documentation here.
SMT is configured right beside connectors as their configuration properties reside inside their same file.
Let’s see one example using FileSource Connector
1 2 3 4 5 6 7 8 9 10 11 | name=local-file-source connector.class=FileStreamSource tasks.max=1 file=test.txt topic=connect-test transforms=MakeMap, InsertSource transforms.MakeMap.type=org.apache.kafka.connect.transforms.HoistField$Value transforms.MakeMap.field=line transforms.InsertSource.type=org.apache.kafka.connect.transforms.InsertField$Value transforms.InsertSource.static.field=data_source transforms.InsertSource.static.value=test-file-source |
As you can see SMT can be combined and chained pretty easily by simply configuring them next to the Kafka Connect sinks and sources.
But the most important thing that should always be kept in mind is the “one message at a time”.
This is particularly crucial because it strongly limits SMT’s usage. In particular, it doesn’t permit any kind of transformation that is characterized by any kind of aggregation logic. Processing one message at a time is mandatory due to how partitions work and how the offset semantic is implemented in Kafka.
9. Converter
Here I create a package converter where I add an example of a converter, Serialize, and Deserializer. Here we have only three methods to implement.
1 2 3 4 5 6 7 8 9 10 11 12 13 14 15 16 | @Override public void configure(Map<String, ?> configs, boolean isKey) { // get the properties } @Override public byte[] fromConnectData(String topic, Schema schema, Object value) { // convert to array of bytes return null; } @Override public SchemaAndValue toConnectData(String topic, byte[] value) { // convert to schema value return null; } |
StringConverter implements Converter
StringDeserializer implements Deserializer
StringSerializer implements Serializer
10. Transformation
Here I just add an example of transformation.
IntegrityCheck
1 2 3 4 5 6 7 8 9 10 11 12 13 14 | @Override public void configure(Map<String, ?> props) { // } @Override public R apply(R record) { // check messages with null key with schema and without schema } @Override public ConfigDef config() { return CONFIG_DEF; } |
11. Deploy
There is an official Kafka Connect Docker image here, but you can use any kafka connect docker image like Debezium
1 2 3 4 5 6 7 | docker run -it --rm --name weather-connect-demo -p 8083:8083 -e GROUP_ID=1 \ -e BOOTSTRAP_SERVERS="bootstrap_URL" \ -e CONFIG_STORAGE_TOPIC=”ID-config” \ -e OFFSET_STORAGE_TOPIC=”ID-offset” \ -e STATUS_STORAGE_TOPIC=”ID-status” \ -v openweathermap-connector/target/openweathermap-connector-0.0.1-SNAPSHOT-jar-with-dependencies.jar/:/kafka/connect/openweathermap-connector \ debezium/connect:latest |
And we need call the rest api with this Json to start the connector;
1 2 3 4 5 6 7 8 9 10 11 12 13 14 15 16 17 18 | { “name”: “weathermap-connector”, “Config”: { “connector-class”:”com.openweathermap.kafka.connect.WeatherAPIConnector”, “Value.converter”:”com.openweathermap.kafka.connect.converter.StringConverter”, “value.converter.encoding”:”UTF-8”, “tasks.max”: “1”, “open.weather.api.key”:”12312312312312313123123123123”, “cities”: “Ireland, Brazil”, “kafka.topic”:”weather”, “name”:”weather-connector”, “transform”:”ReplaceField,IntegrityCheck”, “transform.ReplaceField.type”:”com.openweathermap.kafka.connect.transform.ReplaceField$Value”, “transform.ReplaceField.blacklist”:”main”, "transform.IntegrityCheck.type”:”com.openweathermap.kafka.connect.transform.IntegrityCheck$Value”, “transform.IntegrityCheck.field”:”integrity”, } } |
GitHub
You can check the full code in my Github, and I did a Scala demo as well, where I just follow the same structure of folders, packages and classes.
12. Links
https://docs.confluent.io/current/connect/devguide.html
https://www.confluent.io/wp-content/uploads/Partner-Dev-Guide-for-Kafka-Connect.pdf?x18424
https://docs.confluent.io/current/connect/userguide.html
https://docs.confluent.io/3.1.1/connect/userguide.html
https://www.confluent.jp/blog/create-dynamic-kafka-connect-source-connectors/
Stay tuned! Next blog post I’ll show how to code a Sink Kafka connector.